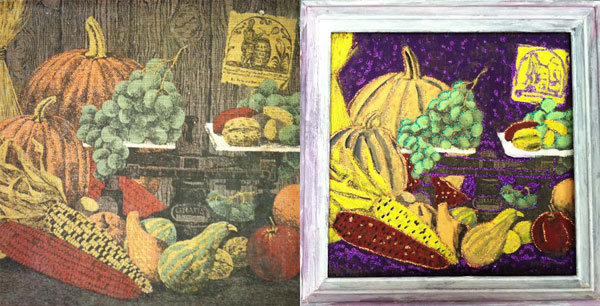
This is a really fun project for older kids and teens. Even the sloppiest artist can turn out a pretty good result.
Here are the materials you need:
- An old fall-themed picture with a frame. The pictured one was found at Goodwill. The original frame (not shown) was a boring chestnut color. The picture was faded and very out of style.
- TIP: Try to find a simple picture with a limited color scheme and recognizable “shapes” within the picture. Photographs will not work well.
- Acrylic paints (you can find a wide selection at most craft stores).
- Squeeze- tubes of sparkle glue in complimentary colors.
- Paintbrushes of various sizes.
- A paper plate (to be used for a paint palette)
- A cup of water for cleaning brushes.
- Paper towels or old cloth towels for cleaning up messes and cleaning brushes.
- Newspaper to protect the surface under the project.
- Paper and pencil.
Directions:
- Comb grandma’s attic; look at your local thrift store or garage sales for holiday-appropriate artwork that can be removed from the frame. (You can do this project for any holiday)!
- Separate picture from frame, and set frame aside. (This may require additional tools and adult help).
- Prepare the work area, and assemble all materials.
- Choose a selection of about five colors of paint and three colors of sparkle glue that match the paint.
- On a piece of paper, paint a dot of each color of paint, and write a number next to it (ex.: yellow-1, green-2, blue-3, etc).
- Take a picture of the original picture, so you can refer to it later.
- Next, take your pencil to the picture and assign each “shape” a number corresponding to the color of paint you want to use for it. You can try to reproduce the picture, or give it a totally new look by using opposite colors, or even black-and-white.
TIP: Make sure that each original color is assigned the same paint color across the whole piece. For example, in my picture, all black areas were done in purple.
- Here’s the fun part. Begin painting! Start with one color and find the corresponding numbers on the piece. Paint all of those sections, and then move on to the next color.
TIP: Try starting with background colors first, and make your way to the foreground.
- When all the shapes are filled, allow the paint to dry for 24 hours.
- Don’t forget the frame. Choose a complimentary color and give the frame a good coat. Get creative. I used two colors, blended, and liked the result.
- Next, it’s time for sparkle glue. (Maybe the guys won’t want to add sparkles, but it may appeal to the ladies).
- Take each color and find the complimentary color in the picture. I used very similar colors in my example.
- Do a little creative “highlighting” of the details of the painting. You can do some shadow work, fill in details that you couldn’t quite showcase with the acrylic paint, and even add new elements to the picture if you wish. If you aren’t using sparkles, you can always highlight with a little more acrylic paint.
TIP: Refer to the photo of the original picture, to get ideas for shadows and highlights.
- Sign the painting with sparkles or a permanent marker, and allow to dry overnight.
- When the piece is dry, return it to the frame.
Proudly display this piece of repurposed artwork for all to enjoy during Thanksgiving dinner for many years to come.

